Github Tutorial
Github Tutorial
by Boxplot Oct 16, 2023

What Is GitHub And Why Is It Useful?
GitHub is the world’s most commonly-used code hosting/storage platform. It is used by coders of all sorts to view, store, write, and collaborate on code, all for free. GitHub uses a tool called Git to enable these abilities (i.e., “GitHub” refers to the website where code gets stored; “Git” is the tool that the website uses to do that). Because GitHub stores code in a centralized location accessible to anyone with the proper credentials, it is an extremely useful resource when it comes to collaboration, update syncing, version history, and so on; these aspects of software development are much more cumbersome if coders are each storing their own copy of your codebases locally. As with any technology, there is a slight learning curve if you are new to GitHub. However, the vast majority of skills you will need to get started using GitHub effectively are covered in this brief tutorial.
GitHub Basics And Initial Setup
The GitHub workflow consists of (1) the directory containing the files that you are editing on your computer, (2) a “staging area” or “index” where files are temporarily stored and verified before being permanently recorded in GitHub, (3) a “local repository” which records your changes but is only visible to you, and (4) a “remote repository” (i.e., GitHub itself) which records your changes so that anyone with access can see them. An important note is that the staging area is temporary storage; you do not create a traceable version history by adding files as you do with the GitHub repository. If you want to have a version history ―being one of the main assets of using GitHub to begin with― you will need to commit your changes permanently to (3) or (4).
You can interact with GitHub repositories and staging areas using either the command line or by using GitHub’s desktop app. To use the command line, you need to have Git installed. It can be downloaded here. The desktop app can be downloaded here.
You need to either start a new repository or clone an existing one to begin inserting files into it. We will have a future blog post that covers these options.
Git Pull
“Pulling changes” refers to the process of updating your own copy of each file that you want to view and/or edit to be in sync with the up-to-date version stored in GitHub before making any of your own changes to those files. It is important ―at the very minimum― to do so each time you edit anything stored in GitHub to make sure the changes you make do not (a) get applied to an out-of-date version, and as a consequence, do not (b) fail to incorporate someone else’s progress.
It’s very simple to perform a pull operation. In the command line:

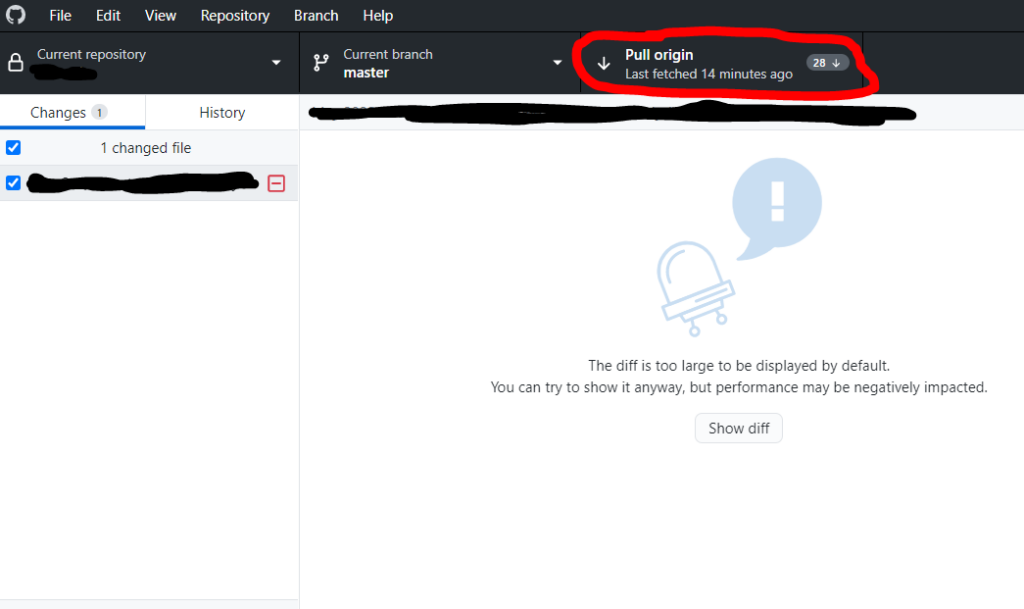
and if you are using the desktop app, use the “Pull origin” button at the top to perform this same task:
Git Add
This command takes your locally-saved files and puts them in the staging area. Note that this step does not make any changes to the GitHub repository. It only moves a “rough draft” of the files to the staging area; if you check over each rough draft file and determine they are all set to overwrite the current versions in GitHub, you then use the git push command to do so (we will cover this command later in this tutorial).
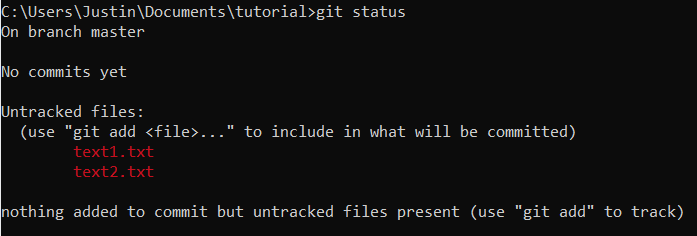
Let’s see how it works in the command line. Navigate to the directory with the files you want to add by dragging the folder onto the terminal. Then, you can check which files are eligible to be uploaded to staging by using the git status command. The eligible file names are shown in red:
Add the files to staging by using the git add command followed by the names of the files you want to add to staging separated by spaces:

Alternatively, put a star rather than the file names to indicate you want to add all files of a certain file type:

Finally, you can add all files in the directory using this command:

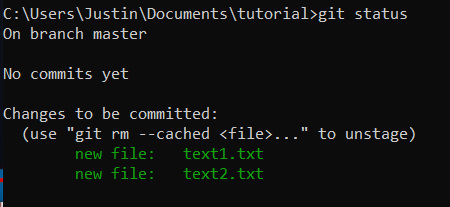
Confirm that the correct files have been added to staging by using git status again. The file names in green confirm they have been added to staging.
Note that it will tell us if any commits have occurred or not.
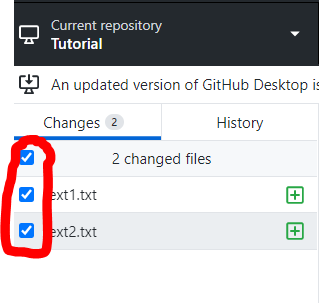
In the desktop app, checking and unchecking files in the toolbar on the left hand side is the equivalent to adding and removing those files from staging:
git commit -m “message”
Uploading your changes to GitHub from the staging area is referred to as “committing” your changes. When you commit changes to GitHub, you pass in a message along with your changes that describes the changes that you are making. This feature is helpful if you ever have to look through the version history of a particular file in GitHub because these messages remind you of what changes occurred with each version; if a certain change ever has to be reverted, you know right where that change occurred. This message gets passed inside quotation marks at the end of the git commit command. For example, if you wanted to copy the two files from the previous section that are currently sitting in staging, you would do this:

If you prefer to use the GitHub desktop app, put your commit message in the box just above where it says “Description” and then click the Commit button in the bottom left:

git push
This command moves what is in staging to GitHub (the remote repository). You can perform this action using this command:

You will be prompted to enter your GitHub username and password. After doing so, the files will be pushed to GitHub.
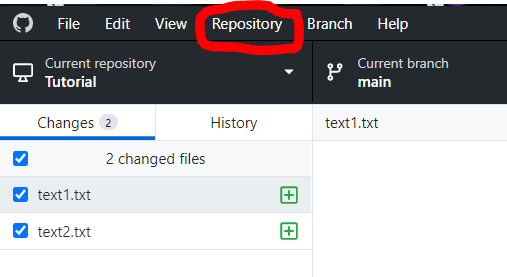
If you are using the desktop app, go to Repository -> Push to push the files.
<< Previous Post
"Excel Templates for Data Analysis"
"What Is Python, And Why Is It Awesome?"